The Adventures of Montgomery Mcvitty…..

My Mr Sharp works very hard, very hard indeed! I wanted to give him a little something to make him smile; something he could have on his desk at work to cheer him up when it’s all getting a bit stressful. I pondered a while. “What does Mr Sharp like when he is feeling a bit overworked?” I wondered…..”Tea!” thought I. “And what is better than a mug of tea?” I asked myself….”Tea with biscuits!” I replied! I thought and thought of how I could combine the two to be a permanent fixture on his desk at work. And from my pondering, Montgomery McVitty was born.

Biscuit mug!

Montgomery McVitty is no ordinary mug… oh no. Not only does he sport a well-groomed moustache and a distinguished gentleman’s monocle, Montgomery the mug has a mouth. “A mouth?” I hear you cry. “Yes, a mouth” says I. “But what use does a mug have for a mouth?” you ask. I agree, it’s quite obserd. But then again, it is actually a very useful thing for a mug to have. Our chap Monty simply looooves biscuits. He can’t get enough of them! When you fill his head with tea, biscuits are what he craves. So pop some tasty biscuits in his mouth and he will willingly share them with you whilst you sup tea from his brow.

"Nom!" says Monty as he stuffs biscuits in his mouth.

I do hope he will enjoy his new home at Mr Sharps office. I will be sending him a fresh supply of biscuits every Monday to see him through the working week. This week, Monty had Double Chocolate Chip Shortbread, and he decreed that he liked these very much. They really are truly delicious. So delicious in fact that the batch I made on Sunday to last all week had been devoured by Monday evening – oops! I’m now hurriedly baking another, much bigger batch to hopefully last Monty and Mr Sharp until Friday.

The recipe is very easy to make with just a handful of store cupboard ingredients. Here’s the recipe incase you fancy baking some too:

Ingredients

  • 175g butter, softened
  • 85g golden caster sugar
  • 200g plain flour
  • 2 tbsp cocoa powder
  • 100g chocolate chips (milk, white or dark)

Method

  • Mix the butter and sugar together with a wooden spoon. Stir in the flour and cocoa, followed by the chocolate chips – you’ll probably need to mix it together with your hands at this stage. Halve the dough and roll each piece into a log about 5cm thick. Wrap in cling film and chill for 1 hr or for several days. Can be frozen for up to 1 month.
  • Heat oven to 180C/160C fan/gas 4. Slice logs into 1cm-thick rounds, transfer to a baking tray lined with baking parchment and bake for 10-12 mins. Cool on the tray.

Shortbread is definitely one of my favourite types of biscuits to bake at home, but I always feel guilty eating them when I have seen just how much butter goes in to them. I wonder if there is such a thing as a healthy, low-fat biscuit that actually tastes good? If you have such a recipe, I’d love to hear from you!

Biscuit mug

While Monty’s face would cheer the most solemn of folk, he does look rather sad whilst bobbing around in the washing up liquid…. His happy little face suddenly looks a bit panicked. Fear not Monty my friend, we won’t let you drown, it’s merely bath time dear chap! You need to look smart for your first day at the office.

Hope you are all having a wonderful week so far folks 🙂 TTFN! xx

A wonderful mum

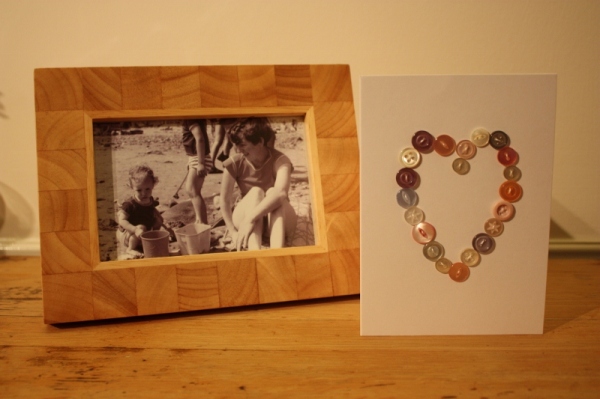
Me and my mum, 1983

I am blessed to have a wonderful mum, and a wonderful mum is she. She raised me with patience and love, inspired me, taught me, encouraged me, mopped my brow when I was sick, held my hand when I was scared, wiped away my tears when I cried. She put up with me as a moody teenager and still loved me unconditionally. She made my world a beautiful place filled with the wonders of nature, imagination, books, art, theatre, museums, galleries, experiences and adventures. We have been through a lot together me and my mum, but we’ve been there for each other every step of the way, standing strong together. I don’t know what I would do without her.

I often forget to take the time to tell my mum just how much she means to me. So, this mothers day I decided to make it a little bit special. I cooked a special lunch, baked the very best treats, laid out the best china and put flowers on the table.

A real hit was the cheese and onion tart I made, mum even asked if she could have a copy of the  recipe. I thought you guys might like a copy too, it’s so easy to make!

Ingredients:

For the pastry:

  • 250g plain flour, plus extra for rolling
  • 125g butter, cold and cubed
  • ½ tsp salt

For the filling:

  • 2 onions, sliced into rings
  •  1 tbsp oil
  •  2 eggs
  • 284ml pot double cream
  • 250g of any cheeses you like!   – I used a third each goats cheese, cheddar and brie

Method:

  1. Put the flour, butter and salt into the bowl of a food processor, then pulse until the mix looks like fine crumbs. Splash in 4 tbsp cold water, then pulse to a dough. Turn onto a lightly floured surface, shape into a smooth disc, then wrap and chill for at least 10 mins. Heat oven to 200C/fan 180C/gas 6.
  2. Roll pastry out on a floured surface until large enough to line a 23cm loose-bottomed tart tin. Line the tin with the pastry, leaving any excess pastry overhanging. Line with baking paper, then fill with baking beans. Bake on a baking sheet for 15 mins. Take out the paper and beans, then bake for 10 mins more until pale golden and cooked.
  3. While the pastry cooks, soften the onions in the oil over a medium heat for 10 mins until golden. Beat the eggs and cream together, then season to taste. Crumble up the hard cheeses and chop or pull the creamy cheese into small pieces. Scatter the cheese into the pastry case, add the onions, then pour in the egg mix. Turn the oven down to 160C/fan 140C/gas 3 and bake for 40 mins until set and lightly golden.
  4. You can serve it warm, but I personally prefer to eat it once it’s been chilled in the fridge.

In keeping with my handmade pledge I made her a card using buttons from the button tin that has been passed down from my grandma, to my mother, and on to me.

Now that my mother has raised us kids and has taken retirement, she finds great joy in tending her garden, so I decided to buy her a cherry tree as a new addition for her little haven. Cherries are her favourite fruit, so I hope it will give her lots to eat!

It’s also my mum’s birthday tomorrow, so happy birthday mum, I hope you have a wonderful day and get spoilt rotten! You deserve it. xx

Winter warmer.

As you have probably guessed by now, I love to cook. I get a genuine feeling of joy out of cooking my wonderful man a hearty meal when he gets home from a hard day at work (I’m such an old-fashioned soul…). Now that the weather is getting a little colder, I want nothing more than to warm his cockles after his chilly commute home from work, and  a little bit of spice does the trick nicely.

A few months ago, while flicking through a copy of Good Housekeeping magazine, I found a Chilli Con Carne recipe that caught my eye. It stood out from the other recipes I had tried before because this one had dark chocolate listed as one of its ingredients. Weird huh? I just had to try it to see how it tasted. Well folks, tonight, I cooked that recipe, and…….. it was freakin’ amazing! By far the best Chilli I have ever had. As soon as I had scraped my bowl clean I made a bee line for my ‘pooter to share it with you all. I simply couldn’t let any of you miss out on this amazing recipe:

Dark Chocolate Chilli Con Carne.

Ingredients:

  • 2tbsp olive oil
  • 500g (1lb 2oz) beef mince
  • 1 large onion, finely chopped
  • 1 tsp each hot chilli powder and ground cumin
  • 3 tbsp tomato puree
  • 300ml (1/2 pint) hot vegetable stock
  • 400g tin chopped tomatoes
  • 25g (1oz) dark chocolate
  • 400g tin red kidney beans, drained and rinsed
  • Large handful fresh coriander chopped
  • sour cream to serve

Method:

  1. Heat 1 tbsp of the oil in a large pan and brown the beef. Remove from pan with a slotted spoon and set aside.
  2. Add the remaining oil to the pan, then fry the onion for  10 mins or until soft and golden. Stir in the spices and fry for 1 min, then return the beef to the pan. Add the tomato puree, hot stock and tomatoes. Bring to the boil, then simmer for 35-40 min or until sauce is well reduced and pulpy.
  3. Stir in the chocolate and kidney beans. Heat through. Finally add coriander and season.
  4. Serve with rice and a dollop of sour cream.

I added a few fresh chillies before simmering as Mr Sharp loves his food quite spicy. Our normally chatty dinner time was filled with nothing but yummy noises and gobbling, and despite being absolutely stuffed there was a small part of us that was genuinely sad that it had all eaten….. well, I did freeze half for another day, but don’t tell Mr Sharp or it may not be there when I go back for it! Best. Chilli. Ever. Nom. Enjoy! I certainly did 🙂

Rock Horror and Rocky Road

I’m having a rather delayed reaction to Halloween today; I have got  a sudden and unexplained urge to watch The Rocky Horror Picture Show! My all time favourite B movie Sci-fi horror.

“What a pleasant way to spend the afternoon” thought I. Of course any act of afternoon film indulgence should always be accompanied by a cup o’tea and a yummy treat; something sweet to give a much needed sugar boost to power through the usual afternoon slump that often makes me fall prey to an unexpected snooze. I fell victim to such a snooze attack yesterday while attempting to watch Downton Abbey. The wonderful Mr Sharp got me the boxset of the first series on Monday, and I couldn’t wait to start watching it. After a busy morning knitting handwarmers for christmas gifts, I settled down with a steaming mug of nettle tea, and pulled a blanket over my knees. There I was, all comfy cozy, enjoying the delectable british accents and fantabulous costumery, when BAM! I got knocked out into a two hour unexpected sleep! Fudged my whole afternoon up royally! So this time I have decided to out smart that sneaky afternoon slump snooze, by plying myself with enough sugar to leave me bouncing of the walls like a looney person in a padded cell, and what better sweet treat to accompany Rocky Horror, than Rocky Road! Nom nom nom!

The Nigella Lawson  Rocky road recipe is one of the best I have tried, but I do like to add a few little tweaks:

Ingredients

  • 200g Dark Chocolate (70% cocoa solids works best)
  • 3 tbsp Golden Syrup
  • 125g Soft unsalted Butter or Margarine
  • 100g Mini Marshmallows (chopped regular marshmallows work too)
  • 200g Digestive biscuits (rich tea or shortbread can also be used)
  • Icing sugar to dust
Tweaks
  •  add a handful of dried fruit such as raisins or cranberries
  • instead of biscuits, chuck in some malteasers, tastes great!
  • Adding some rice crispies gives a much lighter, crunchier texture. About 25 – 30g is usually enough.
To make
  1. Line a small to medium sized square baking tray with baking paper
  2. Place biscuits into a freezer bag and bash with a rolling pin or just the side of your fist until they’re broken into a mixture of everything inbetween dust and 50p size lumps. Put this to one side.
  3. In a large sauce pan melt the butter, chocolate and golden syrup over a gentle heat stirring it almost constantly until there are no or almost no more lumps of chocolate visible, then remove from the heat.
  4. Take biscuits, marshmallows and any additional delicious ingredients and pour into the pan of the chocolate mixture. Stir all this into the mixture until everything is completely covered.
  5. Tip the mixture into the lined baking tray making sure you get it all and spread the mixture in the tray until flat.
  6. Refrigerate this for at least 2 hours then dust with icing sugar and cut into fingers of sizes you deem necessary.
Simples! Just waiting for these bad boys to set in the fridge  so that I can settle down and sing my little heart to all the fantastic Rocky Horror songs. Might even bust a groove to the time warp, well, I gotta burn off those calories some how!
Altogether now, “It’s just a jump to the left……and then a step to the right……Put your hands on your hips…….You bring your knees in tight. But it’s the pelvic thrust that really drives you insane. Let’s do the time-warp again”. Loves it! Happy Wednesday folks, hope your having a good one!

Happy Halloween!

A happy Halloween to one and all from Gizmo and Stitch towers!

20111031-092426.jpg

Hope you all have a spooktastic time!

If you are planning on carving a pumpkin for the evenings frivolities, Martha Stewart online is offering some amazing free pumpkin carving templates that look simply divine!

Beautiful! Click here to access the templates. There are loads to chose from, from very simple yet effective designs,  to beautifully intricate and ornate ones.

Once your pumpkin is carved, you can use the flesh to make these wonderfully delicious Pumpkin Passion Cupcakes:

Nom!

Ingredients:

  • 175ml sunflower oil
  • 175g light muscovado sugar
  • 3 large eggs
  • 1 tsp vanilla extract
  • 200g coarsely grated pumpkin or butternut squash flesh
  • 100g sultanas
  • grated zest 1 orange
  • 2 tsp ground cinnamon
  • 200g self-raising flour
  • 1 tsp bicarbonate of soda

For the frosting:

  • 200g tub full-fat cream cheese
  • 85g icing sugar
  • toasted chopped pecans to decorate (optional)
Method
  1. Heat oven to 180C/160C fan/gas 4. Line a 12-hole muffin tray with paper cases. Pour the oil into a large bowl and add the sugar, eggs and vanilla. Beat together, then add the grated pumpkin, sultanas and orange zest.
  2. Stir in the cinnamon, flour and bicarbonate of soda, the mixture will be quite wet. Spoon into the cases. Bake for 25 mins until firm and springy to the touch and a skewer inserted in the centre of a cupcake comes out clean. Cool completely on a wire rack. At this stage you can freeze the cakes for 4 months.
  3. To make the frosting, beat the cream cheese and sugar together until smooth then spread on top of the cupcakes. Leave plain or decorate with toasted pecans. Store in the fridge, but return to room temperature to serve for the best flavour and texture.
Tip: If the flesh of your pumpkin is quite wet when grated, give it a good squeeze before using it.
Nom nom nom! Have fun folks! xx

Mmmmm, Onion Marmalade!

Why is it that whenever there is something that I HAVE to do, I end up doing something completely different? I had set aside this Saturday to write my UCAS personal statement (I’m applying to study costume production next year, yay! I really, really hope I get accepted…eeep!) but instead I ended up making onion marmalade. Ooops! How on earth did that happen?

The Urban Goblin (aka Lucy) had presented me a beautiful plait of onions as part of my payment for knitted Dennis, and I decided to put them to good use.

Armed with my River Cottage Jams and Preserves book (which, by the way, I highly recommend it if you like that sort of thing!), I set about making me a batch of onion marmalade.

I made my own labels using a great programme called Avery Design Pro5 lite which is available as a free download from here. It works very well with any self adhesive address labels that can be put through your printer. I was really pleased with how they turned out and had a lot of fun making them.

One of the jars is in my fridge and is encouraging me to eat far too much cheese…..  A toasted cheese and onion marmalade sandwich is absolutely divine! I’m going to stash the rest away to make some christmas hampers for my friends, and of course Lucy will receive a jar this week by way of thanks for the onions she gave me, thanks Lucy! xx

Brrrr!

Oooooo, there’s definitely a bit of a chill in the air! I’ve suddenly got an over whelming urge to snuggle up under a blanket, eat lots of puddings and watch classic 80’s movies or back to back episodes of a gritty t.v. series.

I spent a few hours up at the allotment today putting in some hard graft, and although it was a lovely bright day with clear blue skies, it was decidedly nippy! I then took my little old dog Bob out for a walk (actually it’s a bit more of a shuffle these days – he’s a ripe old age of nearly 16 bless him!). After so much fresh air and exposure to chilliness I felt rather sleepy and in a snuggley mood. I had a nice hot bath to warm my bones back up, got into my pijamas at 6pm, hid under a blanket and did some knitting while catching up on episdodes of  “The Great British Bake Off”.

All of a sudden and completely out of the blue, I had a very strong desire to feast upon gingerbread. I didn’t just want gingerbread, I needed it! I dashed off to the kitchen and frantically searched the cupboards for the right ingredients. I  felt a genuine sense of relief to find I had everything I needed!

I mixed all the ingredients together while salivating like one of Pavlov’s pups! I impatiently clock watched while the dough chilled in the fridge for a seemingly never ending 30 mins. I lovingly rolled out the dough, carefully cut out the shapes, and gently placed them into the oven. I sat crossed legged on the floor of the kitchen illuminated by the orangey glow of the oven light, comforted by the delicious smell of the baking gingerbread, and warming myself on the emanating heat. Until, at last, the pinger pinged and finally I could satisfy my craving! Back under my blanket I went with a plate of fresh, still warm, gingerbread ready for the new episode of Dexter on FX. Yum!

I’ve used the same gingerbread recipe for years as it is so simple and always turns out well. I thought I would share it with you guys  incase just like me you get struck by the gingerbread munchies as the temperature drops and Autumn creeps in.

Gingerbread Men

Ingredients:

  • 8 oz plain flour
  • 1 tsp bicarbonate of soda
  • 1 tsp ground ginger
  • 1 tsp cinnamon
  • 4 oz soft brown sugar
  • 4 tbsp golden syrup
  • 2 oz butter or margarine
  • 2 tsp milk
  1. Pre-heat oven to gas 3 (160 oC).
  2. Grease a large baking sheet.
  3. Put the flour, bicarbonate of soda, ground ginger and cinnamon into a mixing bowl and mix gently.
  4. Put the brown sugar, golden syrup and butter into a saucepan and warm gently until the butter has melted, stirring regularly. Do not let it get too hot!
  5. Allow the saucepan to cool a little and pour into the mixing bowl along with the milk.
  6. Mix and knead into a firm dough.
  7. Wrap in cling film and put into the fridge for 30 mins.
  8. Roll out the dough to about 1/4 inch thick.
  9. Cut into about 12 figures (or whatever shapes you like really!)
  10. Place onto the baking sheet
  11. Bake for appox 12 mins at gas 3 (160 oC)

Note: The cooking time is crucial. One minute either way can mean the difference between too soggy and too crisp. What’s more, the best time depends on the oven. So, at first check after 10 minutes, then every minute there after. The biscuits are done when they are slightly browner at the edges, not as soft as they were when they started cooking, but definitely still soft on top. Cool for a couple of minutes before loosening from the baking sheet.

Happy baking! xxx

Summer is here!!!

Ahh, at last, summer seems to finally be here!! I love Britain in the summer time. This weekend I spent my Saturday afternoon drinking Pimms in Saint James’ park, which was packed full of people and the most wonderful atmosphere. Everyone was in a good mood and feeling sociable. I got the opportunity to wear one of my dresses! I have quite an obsession for buying pretty dresses… I just love them! They are my weakness when out shopping. I usually feel a bit guilty about buying them though because I rarely get a chance to wear them, but now the sun is out I can wear one everyday! Horray!!

To me summer means three things; dresses, Pimms, and Elderflower Cordial. I have the dresses (although I could always do with a few more…), Pimms is currently half price in Morrisons and can also be purchased ready mixed in a can (genius!), and the Elderflowers are in full bloom – time to make the cordial! So, this morning I went for a wee stroll in the woods armed with my reusable Tesco bag and a pair of scissors and set about capturing the British summer and putting it in a bottle.

I implore you all to have a go at making some because it is so cheap and easy to make, in fact I will make it even easier by giving you the recipe I use and advice for making it! Yeah! Don’t say I never give you anything :-p

To make the cordial you will need:

  • 1 kg of white granulated sugar
  • 1.5 litres of boiling water
  • 55 grams of citric acid (this can be bought at your local pharmacy for about £1)
  • 4 unwaxed lemons
  • Approx 20 Elderflower heads (if they are small, pick more. They are best picked when the sun is on them and they mustn’t have brown blossoms, as this can foul the cordial).

Method

  1. Put the sugar in a large bowl or saucepan and cover with the boiling water. Stir until sugar is completely dissolved. Leave to cool.
  2. Meanwhile, prepare the elderflower heads by shaking them to remove any creepy crawlies, and pinch off any blossoms that look a bit brown. Cut off the large green stalks, but don’t worry about the finer ones that hold onto the little clumps of blossoms.
  3. When the sugar and water mix is cool add the citric acid, the elderflower heads, and the lemons (zested and sliced).
  4. Cover and leave to steep for about 48 hours.
  5. Once ready strain twice through sterilised muslin (you can sterilise them by scalding them with boiling water)
  6. Using a funnel decant the strained cordial into sterilised bottles and seal immediately to keep from spoiling.

Store the cordial in a cool, dry place out of the sunlight. It’s best kept in the fridge and as long as the bottles have been sterilised properly it should last a good few months.  I personally prefer to keep just one bottle in the fridge and freeze the other bottles so that they keep for longer. The cordial should be drunk within a few days as otherwise it will start to ferment and can make you a bit tiddly! giggle! Dilute to taste with fizzy water and plenty of ice. Yum!

Please feel free to email me if you have any questions, I will be happy to help 🙂

Happy cordial making folks! Slurp!